Assign Enterprise License to user.
Assigning Office 365 licenses using powershell command “Set-MsolUserLicense” is usually straing forward. You just need to find the Accounsku using the powershell command “Get-MsolAccountSku” and assign the licenses accordingly. For example, if you need to assign an E3 license which includes all services like SharePoint online, Exchange online etc…. then you just need to find the Accountsku first. Follow the below steps.
- Log on to a machine that has ‘Microsoft Online Services Module for Windows PowerShell’ installed.
-
Enter the following command and specify credentials for an account that has administrator permissions to your MSOL subscription (such as admin@{tenant_id}.onmicrosoft.com):
$cred = Get-Credential
-
Enter the following command to connect to Microsoft Online Services:
Connect-MsolService -Credential $cred -
Enter the following command to retrieve your organization’s license details:
Get-MsolAccountSku |ft AccountSkuId,SkuPartNumber
-
For example, if you want to assign this license to a user called John.smith@contoso.com then follow the below command.
First you have to set the usage location for the user, before assigning the license.
Set-MsolUser -UserPrincipalName John.smith@contoso.com -UsageLocation USThen set the license….
Set-MsolUserLicense -UserPrincipalName "John.smith@contoso.com" -AddLicenses "XXXXXXX:DEVELOPERPACK"The above command will assign all the services assigned with this license option to user. You can check the assigned services in the office 365 portal.

If you want to assign the same license for more users, then you could use a simple powershell script which accepts the user UPN and Location.
Assign only a service/ services to user.
In some cases, you just only need to assign some services, not just the entire EnterPrise licence. For example, you only need to assign “SharePoint Online” license and not to any other services. In this case, we need to disable all services, except the one that we need to enable. In the below example, we are going to assign only SharePoint license to the user/users.
-
Enter the following command to retrieve your organization’s license details:
Get-MsolAccountSku |ft AccountSkuId,SkuPartNumber

- Note the AccountSkuId and SkuPartNumber values returned and use in the following steps
-
Note the SkuPartNumber value returned by the previous step and use it in the following command:
$ServicePlans = Get-MsolAccountSku | Where {$_.SkuPartNumber -eq "{SkuPartNumber}"}For example:
$ServicePlans = Get-MsolAccountSku | Where {$_.SkuPartNumber -eq "ENTERPRISEPACK"} -
Run the following command:
$ServicePlans.ServiceStatus
-
We must now create a new license SKU definition that applies only the desired service plans. This is done by disabling the plans we don’t want to apply. Refer back to Step 5 for the required AccountSkuId value and then run the following command:
${NewSkuDefinitionName} = New-MsolLicenseOptions -AccountSkuId {AccountSkuId} -DisabledPlans {Comma_Seperated_List_From_ServicePlans.ServiceStatus_Output} -
For example, to create a license SKU definition that only assigns a SharePoint Online license I would run the following command to exclude all plans except SharePoint Online:
$SharePointOnlineSku = New-MsolLicenseOptions -AccountSkuId XXXXX:ENTERPRISEPACK -DisabledPlans SWAY,INTUNE_O365,YAMMER_ENTERPRISE,RMS_S_ENTERPRISE,OFFICESUBSCRIPTION,MCOSTANDARD,SHAREPOINTWAC,EXCHANGE_S_ENTERPRISE -
Now you can assign the new license SKU definition to users:
Set-MsolUser -UserPrincipalName {UserPrincipalName} -UsageLocation {UsageLocation}Set-MsolUserLicense -UserPrincipalName {UserPrincipalName} -AddLicenses XXXXX:ENTERPRISEPACK -LicenseOptions $SharePointOnlineSku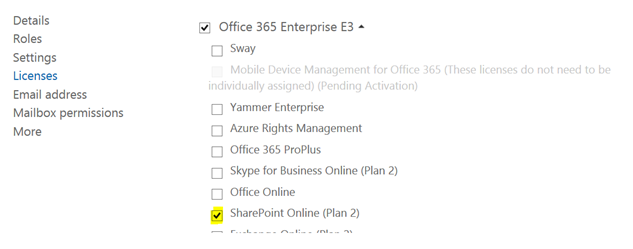
-
If you want to assign the same license for more users, then you could use a simple powershell script which accepts the user UPN and Location. I will explain this in detail later blogs.
Reference: https://technet.microsoft.com/en-us/library/dn771771.aspx

Thank you!
LikeLiked by 1 person